Workspaces
Organize your work into separate workspaces, one per client, each with its own products, campaigns, and data.
Workspaces let you keep work cleanly separated, which is ideal if you manage more than one brand or client. Each workspace has its own name, an optional client label, and a color, and it scopes its own products, campaigns, and data. Workspaces are a paid feature, and creating them uses an allowance granted by our team on request.
At a glance
- What it does
- Separates products and campaigns into per-client spaces
- Where to find it
- Workspace switcher pill under the sidebar logo
- Best for
- Agencies and anyone managing multiple brands
- Availability
- Paid feature; free accounts see an upgrade message
- How many
- Governed by an admin-granted allowance, requested as needed
- Cost
- No credits; governed by your plan and allowance
First, workspaces require a paid plan. Second, even on a paid plan, each new workspace uses one slot from an allowance our team grants on request. When the allowance runs out, you request more.
How it works
- 1
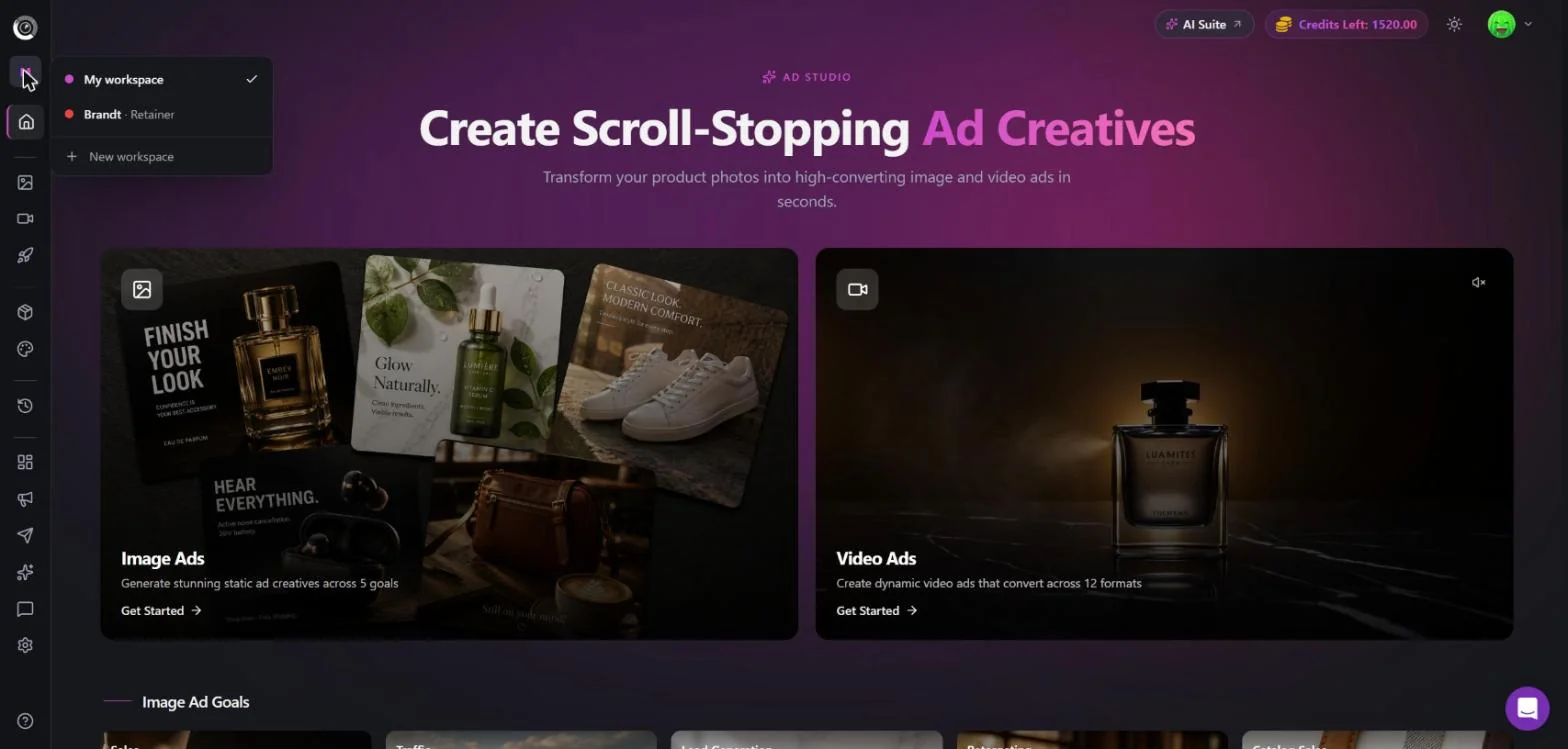
Open the workspace switcher
Click the workspace switcher pill directly under the logo in the sidebar to see your current workspace and any others you can access.
- 2
Switch between workspaces
Click any workspace in the list to switch to it. The app reloads scoped to that workspace so every view refetches its products, campaigns, and data.
- 3
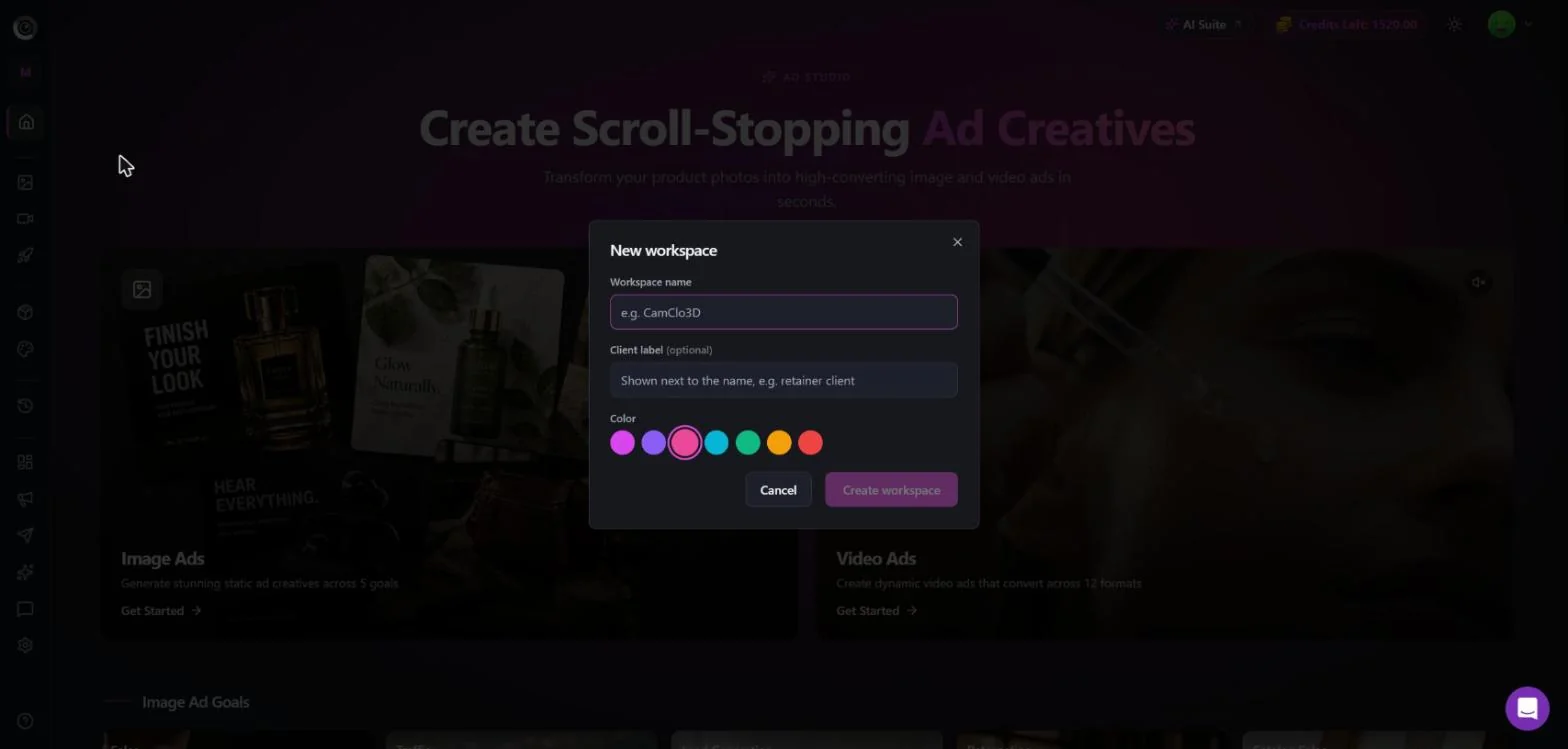
Create a new workspace
Click New workspace and fill in a name, an optional client label, and a color. If you still have allowance left, the workspace is created right away.
- 4
Request more allowance if needed
If you have no remaining allowance, a request form appears instead. Describe your intended use and how many workspaces you need, then submit it for review.
- 5
Create opens automatically on approval
Once our team approves your request, the create dialog opens for you automatically. The request modal updates itself when reviewed, so there is no need to refresh.
Settings & options
| Setting | Options | What it does |
|---|---|---|
| Workspace name | Free text (required) | The name shown in the switcher. Use the client or brand name so it is easy to find. |
| Client label | Free text (optional) | An extra label to identify the client this workspace belongs to. |
| Color | Preset color swatches | A color tag that helps you tell workspaces apart at a glance in the switcher. |
| Intended use (request form) | Free text, at least 20 characters | A short description of how you plan to use the workspaces, submitted when your allowance is used up. |
| Number of workspaces (request form) | Adjustable with +/- up to a per-request maximum | How many workspaces you are requesting. Ask for what you need up front to avoid repeat requests. |
Best practices
Use the client label and color so each client workspace is instantly recognizable in the switcher.
Request the number of workspaces you actually need up front to avoid submitting repeat requests.
Remember that switching a workspace reloads the app, so finish anything in progress before you switch.
Keep one client's products and campaigns in their own workspace to avoid mixing data across brands.
Troubleshooting
Workspaces need a paid plan. See Plans & pricing to upgrade and unlock them.
Your allowance is used up. Submit the request form with your intended use and count, then wait for approval. The create dialog opens automatically once it is granted.
The request modal updates itself once our team reviews it, so there is no need to refresh or resubmit.
Each workspace scopes its own data. Switch back to the workspace where those products live using the switcher pill under the logo.