
Table of Contents
Flat lay photography means laying a product on a flat surface and photographing it from directly above. For clothing, that is a steamed garment on a plain backdrop, soft light from one side, and a camera held level over the center with a 35 to 50mm lens (or a phone's 2x lens) so the edges do not bend. Flat lays are the cheapest way to show a garment's shape, color and details, but they cannot show fit, which is why some marketplaces ask for a model instead.
This guide covers the setup, light, settings, styling and shot list, when flat lay beats on-model photography and when it does not, and how to turn a flat lay into an on-model photo with AI.
We read the marketplace rules and the studio prices on the official pages. Here is how we checked.
On a tripod arm, boom or copy stand.
On a phone, use 2x from farther away.
Window or softbox on one side, white card on the other.
RAW, white balance from a grey card.
Plus hardware and a styled outfit for social.
Detail images, kidswear, social, AI on-model photos.
What flat lay photography is
A flat lay is a top-down photo of items arranged on a flat surface. Because the camera looks straight down, every part of the garment sits at the same distance from the lens, and nothing hides behind anything else. For clothing there are two styles, and most sellers need both:
- Catalog flat lay: one garment, alone, centered on a plain white or light grey backdrop, shot the same way for every product. This is the product page image.
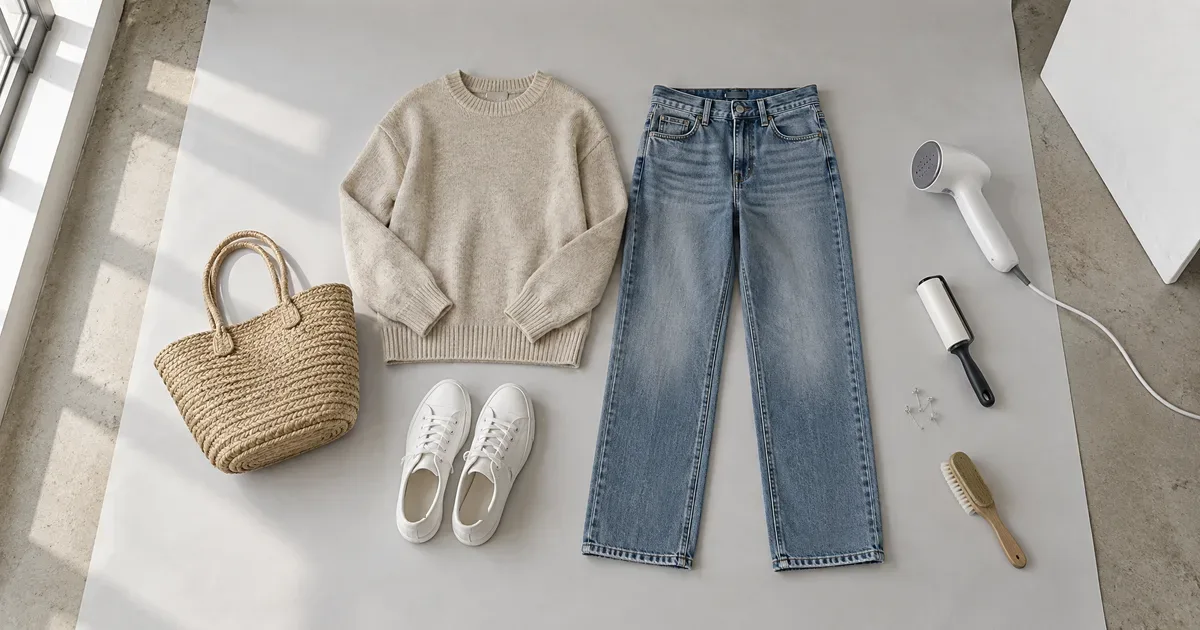
- Styled flat lay: an outfit built around one hero piece, with shoes, a bag or jewelry, on a textured surface with space around it. This is for Instagram, Pinterest, lookbooks and emails.
Most of this guide is about the catalog style, with notes where styled shots differ.
The flat lay photography kit
- Surface: seamless paper, foam board or a clean floor, white or light grey for catalog shots.
- Camera or phone: any camera with manual settings, or a phone with a 2x lens.
- Overhead support: a tripod with a horizontal arm, a C-stand with a boom, or a copy stand. Sandbag anything that leans over the garment.
- Light and fill: a large window with a sheer curtain, or two softboxes or LED panels, plus a white foam board to bounce light into the shadows.
- Small kit: a grey card, a steamer, a lint roller, scissors, tissue paper, pins, low-tack tape, clamps and a spirit level.
If you are weighing up kit against hiring a studio, our guide to what product photography costs breaks down both.
How to shoot flat lay clothing, step by step
1. Prep the garment
Steam out every crease, including the fold lines from packaging, then go over it with a lint roller. Trim loose threads, empty the pockets, close zips and buttons, and tuck away swing tags and stickers. Every flaw shows at full zoom, and each one you fix now is one you do not retouch later.
2. Set up the surface
Lay the backdrop flat and smooth, away from walls that throw colored light. Mark the garment's position with small pieces of tape at the edges of the frame, so every product in the range sits in the same place.
3. Put the camera directly overhead
Center the lens over the middle of the garment and check with a level that the camera is parallel to the surface; a tilted camera turns a rectangular shirt into a trapezoid. Then set the height. A longer lens bends the edges less but has to go higher. As a rule of thumb, the lens-to-garment distance is the frame length you need times the focal length, divided by 36 (full-frame equivalent, long side of the frame along the garment).
| What you shoot | Frame length with margin | Camera height at 35mm | Camera height at 50mm |
|---|---|---|---|
| T-shirt or shirt | About 0.95 m | About 0.9 m | About 1.3 m |
| Jeans, full length | About 1.3 m | About 1.3 m | About 1.8 m |
| Midi dress | About 1.5 m | About 1.5 m | About 2.1 m |
Heights are measured from the lens to the garment and rounded. They come from the lens's angle of view, so check the framing on your own setup.
That is why many studios shoot long garments on the floor from a boom or a ladder, or pin them to a board on the wall and shoot straight on. On a phone, the main camera is wide (around 24 to 26mm equivalent on most models), so switch to 2x and raise the phone rather than holding the 1x lens close to the fabric.
How to light flat lay photography
Flat lays need soft light that comes from the side. Light from directly above is hard to use: the camera and its stand sit in the way and cast shadows, and flat top light hides fabric texture.
- A window or softbox, to the side of the garment, not above it.
- Diffusion, such as a sheer curtain or diffusion fabric, to soften direct light.
- The camera, directly overhead with the sensor parallel to the backdrop.
- The garment, centered on a plain backdrop.
- A white foam board opposite the light, to fill the shadows.
- Window light: a large window with no direct sun, or sun softened by a sheer curtain, with the white board on the far side. Switch off the room lights: warm bulbs mixed with daylight leave color casts that are hard to correct. Daylight shifts through the day, so shoot a range in one session.
- Softboxes or LED panels: for an even catalog look, two at about 45 degrees on either side at the same power, daylight-balanced (around 5,500 to 5,600K) and not mixed with window light.
- Texture: to show the weave of knitwear, denim or linen, lower one light so it skims across the fabric from the side.
- White and black garments: check the histogram. White tees lose texture if the highlights clip, black ones lose detail in the shadows. Expose for the garment, not the backdrop.
Camera and phone settings for flat lays
| Setting | Camera | Phone |
|---|---|---|
| Lens | 35 to 50mm (full-frame equivalent) | 2x lens, phone raised higher |
| Aperture | f/8 to f/11. The garment is flat, so there is little depth to cover. | Fixed on most phones; nothing to set |
| ISO | 100 to 200, the lowest your light allows | Lowest available in a manual or pro mode |
| Shutter | Any speed on a stand; use a 2-second timer or a remote | Self-timer or a remote shutter, phone on a mount |
| White balance | Custom, from a grey card; or match the light (daylight for flash) | Lock exposure and focus, fix color from the grey card later |
| Focus | Single point on the center of the garment, or manual | Tap to focus on the fabric, then lock it |
| File | RAW | RAW if your phone offers it |
If your camera supports it, shoot tethered to a laptop, so you can check framing and creases on a large screen before you move to the next item.
How to style clothing for a flat lay
A garment lying loose looks shapeless. Styling gives it the shape it has when worn: hold it from underneath with pins into foam board or tape on the back, add a little volume with tissue paper inside the body and sleeves, and keep the layout symmetrical along the center line.
| Garment | How to lay it | Watch for |
|---|---|---|
| T-shirts and tops | Sleeves angled slightly down, side seams tucked under a little for a tapered shape, tissue inside for volume | A twisted neckline and uneven sleeve lengths |
| Shirts | Buttoned to the top, collar flat and even, cuffs visible | A gaping placket and a lifted collar |
| Knitwear | Laid loosely, never stretched, steamed gently | Cuffs and hem pulled out of shape |
| Jeans and trousers | Full length, legs slightly apart, waistband straight, fly closed | Folding them: it hides the leg shape and the hem |
| Dresses and skirts | Waist defined, skirt fanned slightly, hem straight | Straps and ties that wander out of line |
| Jackets and coats | Closed, lapels flat, sleeves slightly bent at the elbow | Heavy fabric pulling the shoulders out of line |
| Outfits and sets | Top above the bottom, as if worn, shoes or accessories to the side | Props that pull the eye away from the item you sell |
Keep the range consistent. Same backdrop, tape marks, camera height, light power and crop for every product, because shoppers compare products side by side in a grid. For styled flat lays the rules loosen: leave empty space around the hero piece, keep props in one color family, and arrange items off-center.
The flat lay shot list
- Front, full garment: the main flat lay.
- Back, full garment: for back pockets, prints, yokes and closures.
- Fabric close-up: with raking side light, so shoppers can see the weave or knit.
- Hardware and trims: buttons, zips, embroidery, labels on the outside.
- Inside: the lining or seams, if they are part of the quality story.
- Color variants: each colorway in the same position and crop.
- Styled outfit: for social media, emails and lookbooks.
Editing and exporting flat lays
- Correct the color first. Set white balance from the grey card frame, sync it across the session, and compare the screen with the real garment in daylight. Amazon's clothing guide says the color in the image must match the product for sale.
- Clean up. Remove lint and stray threads the roller missed. Our roundup of background removers covers tools for cutting the garment out onto pure white.
- Crop to one standard. Same ratio and margins across the range. Google recommends the product fill 75% to 90% of the image; Amazon asks for 85% of the main image area.
- Export big enough. Amazon's zoom needs 1,000 pixels or more on one side. Google recommends about 1,500 by 1,500 pixels or above, and from January 31, 2027 requires at least 500 by 500. Exporting 2,000 pixels on the long side, in sRGB, clears both.
Common flat lay mistakes
- A tilted camera, which turns straight edges into angles.
- A wide lens held close, which stretches sleeves and hems near the edges of the frame.
- Mixed or hard light, which leaves color casts and dark shadows along one side.
- Clipped whites, which erase the texture of white and pale garments.
- Creases, lint and loose threads, which look worse at full zoom than they do on the table.
- Folded garments as the only image, which hide shape and length. Amazon also prohibits folded products in main images.
- Busy props in catalog shots, which compete with the product.
- A different setup for every product, which makes a category page look like several shops.
Flat lay vs on model photography
Flat lays show the garment. On-model photos show how it fits. Neither replaces the other, and the marketplaces have rules on which goes where.
| Flat lay | On model | |
|---|---|---|
| Shows best | Shape, print, color and details, evenly lit | Fit, drape, length and scale on a body |
| Cannot show | How it fits or moves | Every detail at once; arms and poses hide parts of the garment |
| Studio price (Squareshot) | Product shoots from $50 per image | Model shoots from $95 per image |
| People and time | One person, no booking | A model to cast and book, plus styling |
| Consistency | High: the same layout every time | Varies with model and pose |
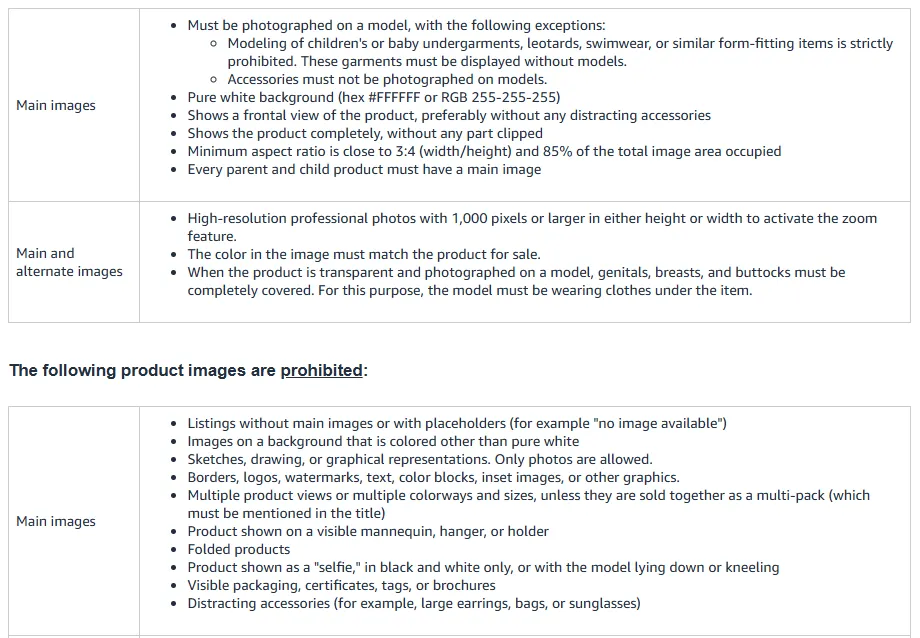
| Amazon US main image, adult clothing | Not allowed | Required |
| Amazon US main image, kids' undergarments, leotards, swimwear | Allowed: these must be shown without a model | Prohibited |
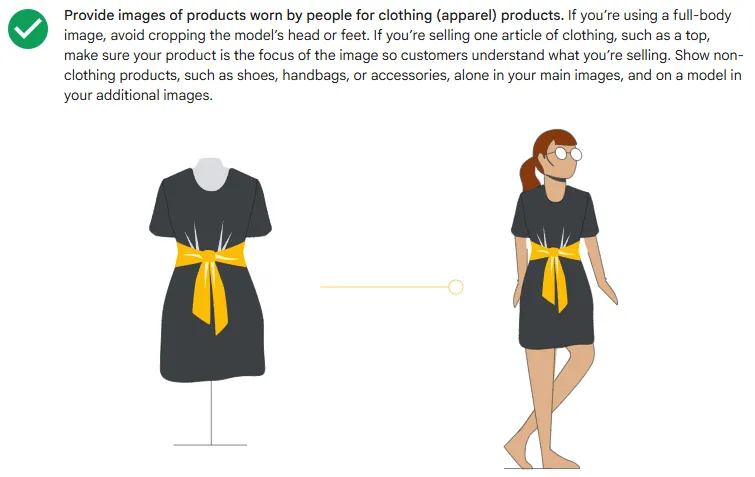
| Google Merchant Center | Accepted | Recommended for clothing |
| Best use | Alternate images, details, color variants, social | Main image, fit-led items, ads |
Amazon rules from its US "Image guidelines for clothing" and Google's from its image link requirements. Squareshot prices are its entry prices in US dollars.
Amazon's rule catches most clothing sellers. Its US image guidelines for clothing say main images must be photographed on a model, on pure white, and prohibit folded products and products on a visible mannequin, hanger or holder. Flat lays can still go in the alternate images (up to eight per SKU), which Amazon describes as showing other views, detail, fabric and cut.
Google Merchant Center is softer. Flat lays are accepted, but its image requirements list clothing worn by people as a best practice, without cropping the model's head or feet in full-body shots.
The cost gap is real. Squareshot, a product photography studio, lists product shoots on white or colored backdrops from $50 per image and model shoots from $95 per image, before add-ons.

When flat lay is the better choice
- Kidswear on Amazon. Children's and baby undergarments, leotards, swimwear and similar form-fitting items must be shown without a model.
- Basics in many colors. One setup and one layout make every colorway directly comparable.
- Prints and graphics. A flat garment shows the whole print, with no arms or folds in the way.
- Detail and alternate images. Fabric, stitching, hardware and the inside of the garment.
- Styled outfits for social media, where the arrangement is the content.
- The input for AI. A clean flat lay is the best starting photo for an AI on-model image.
When on-model is the better choice
- The Amazon main image for adult clothing, which must be on a model.
- Fit-led items such as jeans, dresses, tailoring and activewear, where shoppers want to see length and fit.
- Ads, where a person wearing the item shows it in use.
In between sits the ghost mannequin: the garment is shot on a mannequin that is removed in editing, so it keeps a worn shape without a person. For adult clothing on Amazon it is still not a model, so it goes in the alternate images too. Our guide to ghost mannequin photos with AI covers how to make them, and our Amazon product photography guide covers the rest of Amazon's image rules.
How to turn flat lays into on-model photos with AI
AI closes the gap: you shoot the flat lay once and generate the on-model image from it. A flat lay shot as AI input differs slightly from one shot for the product page.
- Shoot it unfolded, whole and plain. The AI can only copy what it sees, so lay the full garment out, front up, with nothing cropped and no props; folded jeans hide the leg shape and the hem. CamClo AI's upload tips ask for a clear, high-resolution photo on a plain white or light background, with good light and no harsh shadows.
- Pick how the model is chosen: a library model, a photo of a model you have the rights to, or a model the AI creates, optionally from a short description.
- Add a styling note where it matters, such as "tuck in the shirt" or "sleeves rolled up".
- Check every detail against the real garment: print and logo placement, buttons, pockets, neckline, length and color. Fit on an AI model is illustrative, so keep your size chart accurate.
- Keep the real back flat lay. An AI back view is generated, not photographed, so compare it with the garment and keep the flat lay as an alternate image.
- Label AI people before you upload, as covered below.
CamClo AI
Best for: turning flat lays into on-model catalog photosCamClo AI is an AI studio for ecommerce teams. Its Fashion Studio tools turn the product photo you already have into on-model images and extra poses, and Image to Video animates the result.
- Virtual Try-On: upload the garment photo, pick a model from the library or upload your own model photo, and add an optional styling note. Output at 1K, 2K or 4K, for 1 to 3 credits per image depending on the quality mode and resolution.
- Product to Model: upload only the product photo and the AI creates the model, with an optional description of the model and scene, in nine aspect ratios including 1:1, 3:4, 4:5 and 9:16, or matching the input photo. Also 1 to 3 credits per image.
- Catalogue Studio: turn one on-model image into up to 12 poses of the same model in the same outfit, or pick up to 10 preset views such as back, side profile, three-quarter and close-ups. From half a credit per pose on paid plans.
- Image to video: animate the finished photo into a short clip for product pages and social media.
- Pricing: plans from $49 per month with 150 credits. There is a 7-day free trial with 20 credits.
Strengths
- Starts from the flat lay you already shot, with no model to book
- A library model, your own model photo, or a model the AI creates
- Back, side and close-up views from one on-model image
- Photos and video from the same garment photo
Limits
- Can seem a little expensive next to a single try-on app, but the credits cover the on-model photo, the extra poses and the video, not just one raw image
See the virtual try-on tool for flat lay clothing photos, the product-to-model photo generator, and the AI pose generator for catalog views. To animate the result, use image to video.
For a short walk-through of the upload, pick and generate steps, see our earlier guide to turning flat lay clothing into AI model photos. To compare tools, see our roundup of AI fashion model generators for ecommerce.
Label AI-generated people before you upload
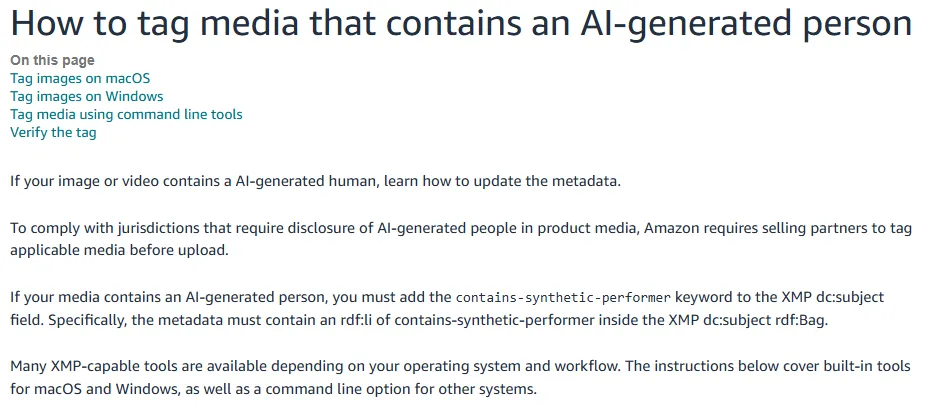
Two big channels now ask for it. Amazon requires the keyword contains-synthetic-performer in the XMP dc:subject field of any image or video with an AI-generated person. On Windows that is the Tags field on the Details tab of the file's Properties; on a Mac, the Keywords tab in Preview's inspector. Amazon's clothing guide still says main images must be photographed on a model, so check its current rules before you use an AI model photo as a main image.
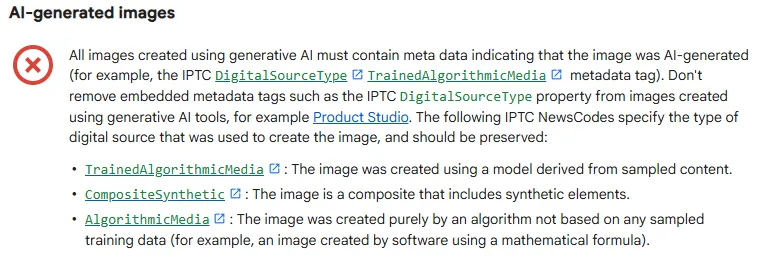
Google Merchant Center requires images made with generative AI to carry metadata saying so, such as the IPTC DigitalSourceType value TrainedAlgorithmicMedia, and asks sellers not to remove it. Whatever tool you use, check the file's metadata before you upload.
How we checked
We read Amazon's US Seller Central articles on clothing images and on tagging AI-generated people, Google Merchant Center's image link requirements and Squareshot's pricing page, and saved screenshots of each. Camera heights are worked out from the angle of view of a full-frame-equivalent lens and rounded. CamClo AI's features and credit costs are as they appear in the product. We did not run a sales test, so this page makes no claim that flat lays or on-model photos sell more.
Frequently asked questions
What is flat lay photography?
Flat lay photography is shooting items laid on a flat surface from directly above, with the camera parallel to the surface. For clothing it usually means one garment on a plain backdrop for a product page, or a styled outfit with accessories for social media and lookbooks.
How do you shoot flat lay clothing?
Steam the garment and remove lint, lay it on a plain backdrop, and shape it with tissue paper, pins or tape. Light it with a large soft source from one side and a white bounce card on the other. Put the camera directly overhead and level, use a 35 to 50mm lens or a phone's 2x lens, and shoot at f/8 to f/11 and ISO 100 to 200 from a stand or tripod arm. Shoot the front, the back and close details, then set white balance from a grey card when you edit.
What is the best lighting for flat lay photography?
Soft, even light from the side. A large window without direct sun works, with a white foam board opposite to fill the shadows and the room lights switched off. For many products, or the same look on different days, use two daylight-balanced softboxes at about 45 degrees on each side, or one low side light to bring out knit and denim texture.
Flat lay vs on model: which is better for selling clothes?
Use both. Flat lays show the whole garment, its color and its details consistently and cheaply. On-model photos show fit, drape and length, which shoppers cannot judge from a flat lay. Amazon's US clothing guide requires adult clothing main images to be photographed on a model, and Google Merchant Center recommends clothing images worn by people, so flat lays usually work best as the additional images.
Can I use a flat lay as my Amazon main image?
For most adult clothing, no. Amazon's US clothing image guide says main images must be photographed on a model, and it prohibits folded products and visible mannequins or hangers in the main image. The exceptions go the other way: children's and baby undergarments, leotards, swimwear and similar form-fitting items must be shown without a model, and accessories must not be shown on a model. Flat lays can still go in the alternate images.
Can AI turn a flat lay into an on-model photo?
Yes. Virtual try-on tools such as CamClo AI take a flat lay and put the garment on a model, either one you pick or one the AI creates. Start from a sharp, unfolded, evenly lit flat lay, check prints, buttons and length against the real garment, and label AI-generated people where the marketplace asks: Amazon requires a contains-synthetic-performer tag, and Google Merchant Center requires AI-generation metadata.
Turn your flat lays into on-model photos
Try CamClo AI free for 7 days with 20 credits.
See plans and the free trial