
Table of Contents
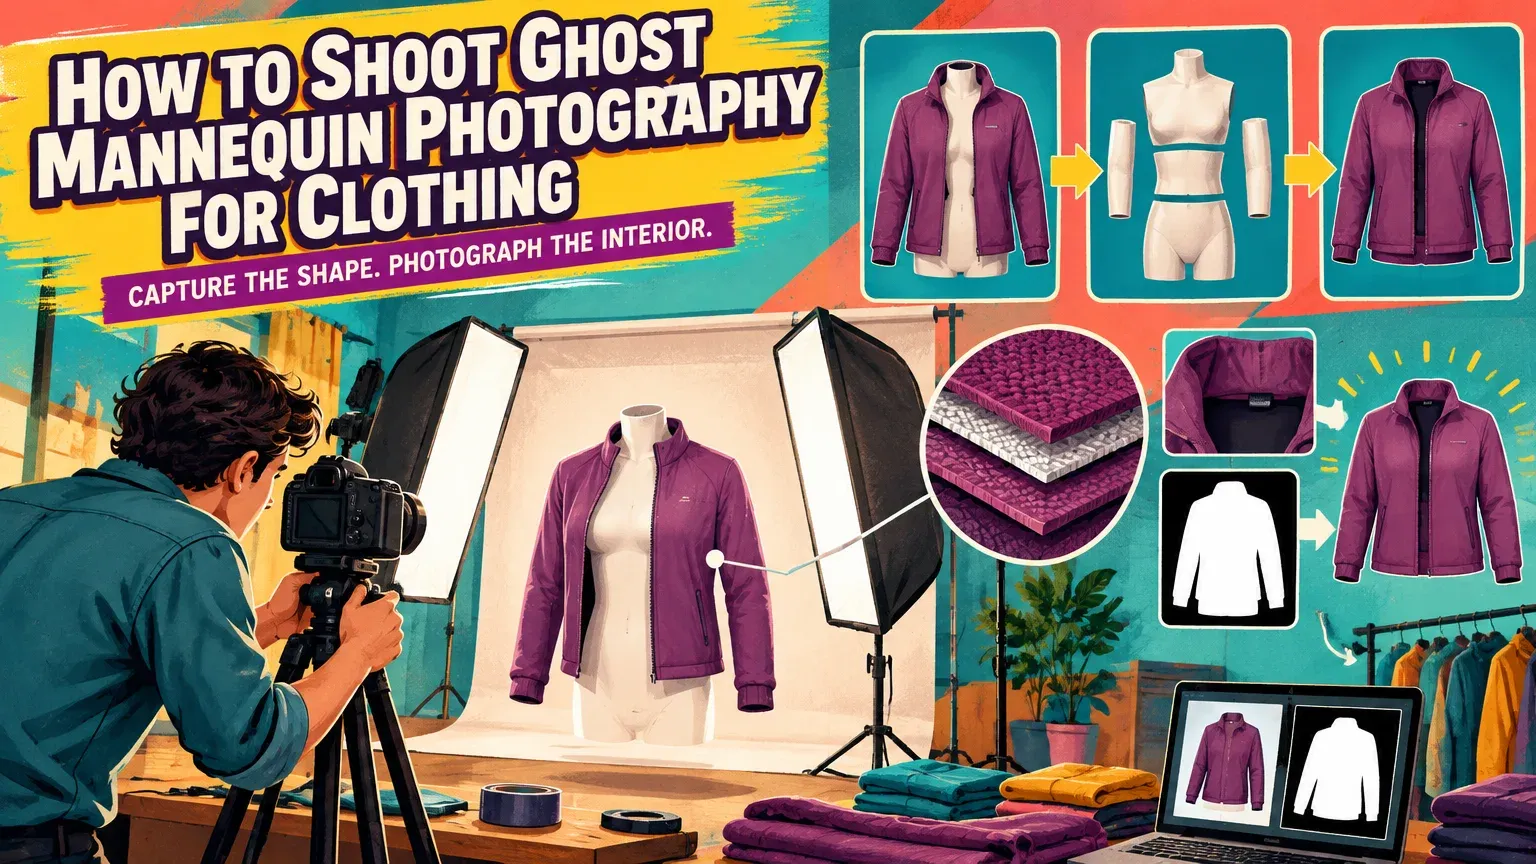
Here is how to shoot ghost mannequin photography: photograph the styled garment on a correctly sized mannequin, capture the hidden interior fabric separately, then mask away the support and align the interior beneath the main image. The traditional method uses an inside-out garment shot and a two-image composite, according to Profoto’s capture guidance. The result retains garment volume without visible support. A front composite commonly needs two sources; back listing views document the exterior rear. Common starting settings are ISO 100–200 and f/8–f/11.
You need basic manual-camera skills, a mannequin setup and an editor with layers and masks. Work through preparation, capture, compositing and verification. Budget those stages separately: garment complexity, source quality and operator skill determine the time.
1. Choose the mannequin, equipment and production route
Invisible mannequin photography, also called hollow-man photography, works with either a removable-section mannequin or a conventional dress form. Choose the correct size first: Profoto’s mannequin selection guide emphasizes matching the form to the product. Removable neck and chest sections expose interiors more easily; a regular form requires interior shots on discreet supports.
- Capture: camera with manual controls, moderate focal-length lens and sturdy tripod.
- Lighting: soft lights, diffusion and a neutral backdrop.
- Preparation: steamer, lint roller, discreet clips and suitable supports.
- Editing: layer-capable software with masking and local adjustments.
- Optional: tethered capture for inspecting focus, labels and source coverage before undressing the mannequin.
Common guide estimates put a basic DIY setup at $900–$2,500+, before labor. Published service ranges cover different work; these figures are in US dollars, rounded to whole dollars.
| Service scope | Quoted price per image | What you provide |
|---|---|---|
| Edit-only, lower quoted range | About $1–$5 | Complete source photographs |
| Edit-only, higher quoted range | $3–$10 | Complete source photographs |
| Shoot-and-edit package | $25–$120 | Garment and photography brief |
Compare quotes by garment complexity, views, revisions and deliverables. Common edit-only turnaround examples are 24–48 hours; confirm the commitment. Equipment costs, taxes and services vary by country. Our product photography cost comparison explains broader production budgeting.
2. Prepare the garment and lock the shooting setup
- Prepare: steam, let the fabric cool and settle, then lint-roll. Remove temporary tags and loose threads, keeping permanent labels intact.
- Fit honestly: fasten the garment correctly, align shoulders, seams, placket and hem, and arrange sleeves with natural volume. Hide clips without pulling the garment into a falsely fitted silhouette.
- Shape the light: try two diffused sources around 45° to the garment. Adjust their balance to reveal texture without flattening dimensional shading.
- Lock geometry: mark tripod, mannequin and light positions. Keep the camera level with the relevant garment area.
- Lock capture: shoot RAW with manual exposure. Start around ISO 100–200 and f/8–f/11, then check sharpness and depth of field. Choose shutter speed for the available light and, when using flash, its synchronization limit.
Canon’s product photography guidance recommends apertures within f/5.6–f/11 for depth of field. The University of Illinois studio guide provides an ISO 100, f/8 and custom-white-balance starting example for artwork.
Photograph a neutral reference and preserve white balance, exposure and lighting between compatible frames. Record camera height, focal length and crop. Follow Profoto’s fit guidance: keep styling consistent and represent the fit correctly.
3. Capture the listing views and hidden interior plates
Separate listing views from composite sources
A front composite commonly uses FRONT-HERO plus INNER-NECK; BACK-LISTING documents the garment’s exterior back. Capture additional interior plates only where hidden fabric will appear in the finished image.
| Shot | Purpose | Visible construction | Landmarks | Approve before removal |
|---|---|---|---|---|
| FRONT-HERO | Main exterior | Shoulders, sleeves, front, hem | Neck corners, seams | True fit and sharp detail |
| BACK-LISTING | Back product view | Exterior back and seams | Center seam, shoulders | Consistent styling and crop |
| INNER-NECK | Fill neckline opening | Inside-back collar, label, fabric | Collar corners, label, center back | Complete coverage and readable detail |
| EXTRA-INTERIOR | Fill other openings | Armhole, cuff, hem or lining | Opening edges, seams | Compatible perspective and lighting |
The source relationship is simple: front exterior plus inside-back neck makes the front composite. Use the exterior back to complete your listing coverage.
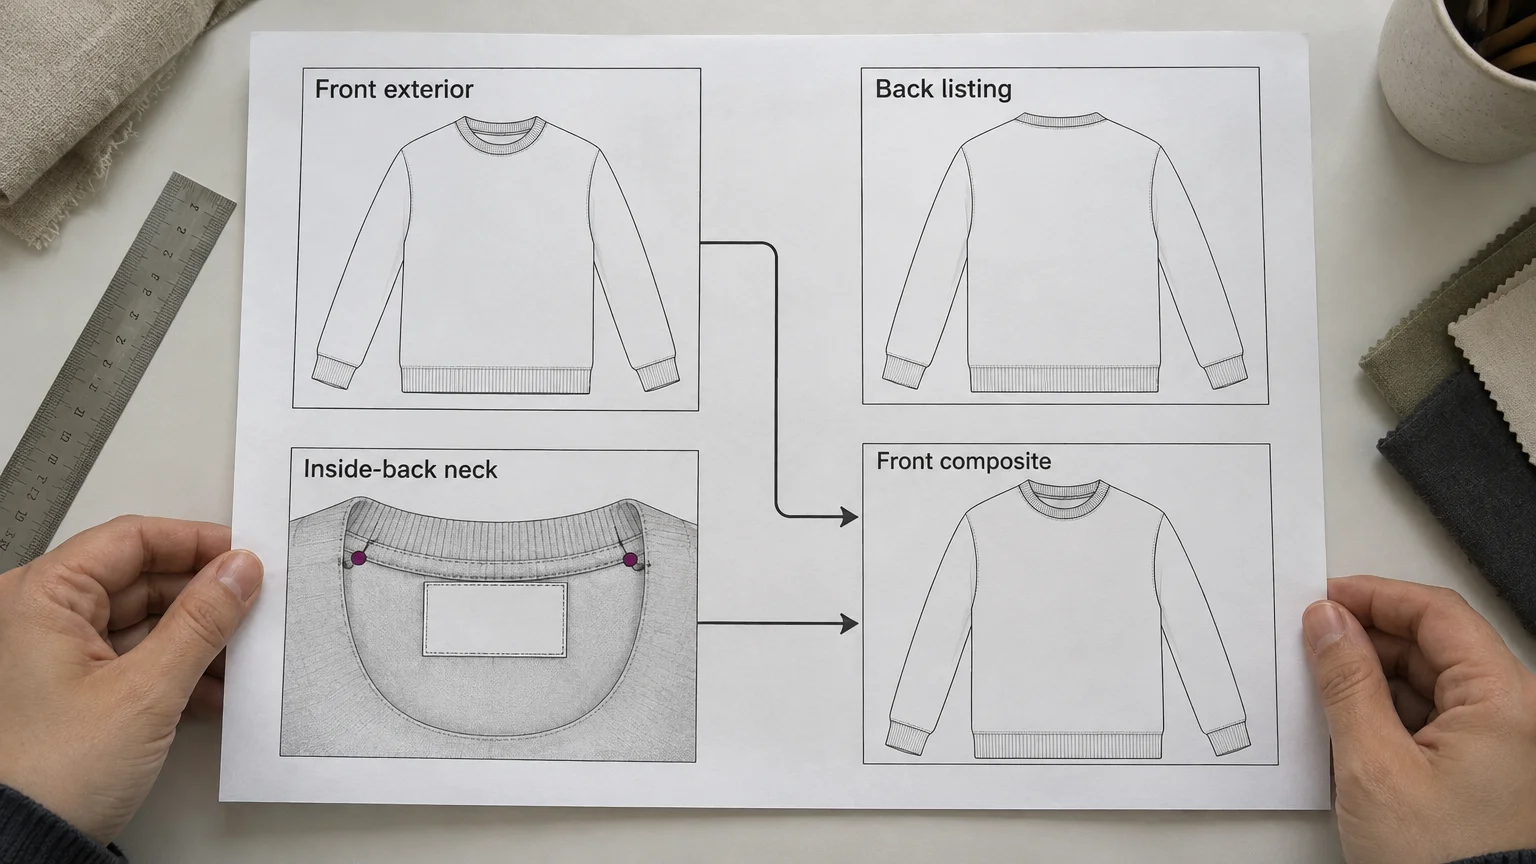
Expose the inside-back collar using either capture route
Photograph the inward-facing fabric behind the front neckline, including the label and surrounding material. An exterior back photograph does not document this surface.
- Removable-section route: remove the neck or inner chest component blocking the collar while retaining shoulder support. Profoto’s shirt walkthrough demonstrates how these removable pieces expose the inside-back label. Confirm that the entire required opening is visible.
- Conventional-form route: capture the hero first, then reposition the garment on discreet supports to expose the inside-back neckline. Turn back or partially invert only what is necessary. Support the shoulder edges, preserve collar curvature and keep supports outside the required fabric area.
Include extra fabric around the join. Retain neckline corners, center-back features and shoulder transitions for alignment. Compatible perspective, scale and light matter; deliberate repositioning and minor alignment corrections are acceptable.
Sleeveless garments may need armhole interiors; jackets may need cuffs and lining; open-hem dresses may need hem interiors. Check focus, labels, truthful fit and complete coverage before removing anything.
4. Composite the neckline without losing fabric detail
Mask the main garment, place the interior beneath it and align the neckline before adjusting local tone. Profoto’s cardigan workflow uses this underlying-image arrangement.
- Develop compatible sources: match RAW white balance and exposure, then open the images in one layered document. Preserve originals.
- Mask the exterior: isolate the garment and its neckline opening without erasing pixels. Keep genuine fibers and contours. Adobe’s layer-mask guidance explains that masks change visibility without changing underlying pixels.
- Align the interior: place it beneath the exterior. Use neckline corners, label position and shoulder transitions. Apply modest movement, scaling and rotation without distorting construction.
- Blend the join: mask unnecessary interior fabric. Place each clipped tonal adjustment immediately above its target layer. Use the interior plate’s adjustment and a softly graded mask to match its tone and shading while retaining believable depth. Adobe’s adjustment-mask guide explains these smooth transitions.
- Inspect edges: test contrasting temporary backgrounds. Refine masks locally; for remaining color fringes, try Adobe’s Decontaminate Colors control, outputting to a separate layer.
Layer order, top to bottom: outer-garment adjustments, masked outer garment, interior adjustments clipped to the interior plate, masked interior plate, background. Inspect both close up and at normal viewing size for lost texture or implausible collar geometry.
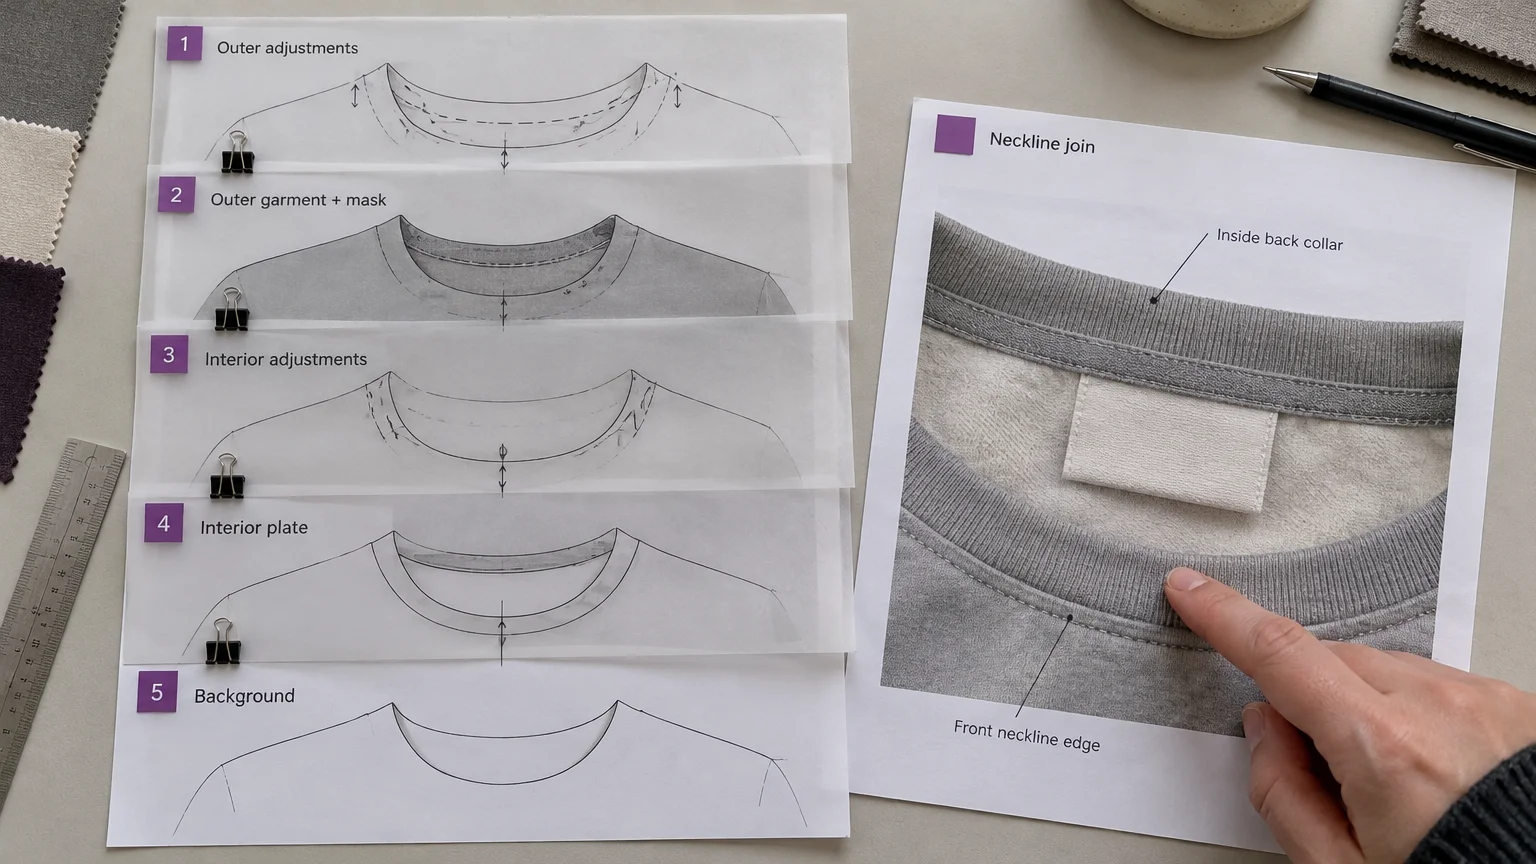
5. Fix editing problems and identify necessary reshoots
Reshoot when the source lacks real product information or accurate shape; edit when the necessary detail already exists.
| Problem | Editing fix | When to reshoot |
|---|---|---|
| Visible pins or clips | Remove using documented surrounding detail | Hardware hides distinctive stitching or print |
| Uneven neckline | Correct alignment and masks | Garment was twisted or falsely fitted |
| Missing interior fabric | Use another photographed plate | No source documents the required surface |
| Edge halos | Refine masks and color fringes locally | Usually unnecessary for a masking defect |
| Color shifts | Match RAW files using the neutral reference | Clipped channels or incompatible illumination prevent recovery |
| Collapsed sleeves | Retain only source-supported shape | Restyling is needed to restore volume |
Do not shrink every mask edge to eliminate halos: that can remove fibers. For sheer fabric, lace, reflective materials or complex linings, hire a professional retoucher when the masking exceeds your skills. Supply paired sources, product references and a clear approval brief.
6. Choose manual finishing, AI assistance or a retoucher
Use photographed sources for factual construction; reserve AI assistance for changes you can verify. Professional retouching is preferable when precise joins or delicate edges exceed your team’s skills.
| Route | Inputs | Suitable work | Risk and approval |
|---|---|---|---|
| Manual compositing | Exterior and interior plates | Exact joins and controlled masks | Check alignment, edges and construction |
| Source plates plus AI cleanup | Verified composite and originals | Selected background or cleanup changes | Compare changed and unchanged areas |
| Single-reference AI reconstruction | One reference image | Proposed reconstruction | Hidden fabric may be invented; verify against actual product photos |
Photograph and verify every SKU. One garment image does not document another product. A plausible generated collar is not evidence of its real construction.
Our Smart Edit accepts text instructions to change backgrounds and add or remove elements. For optional finishing, retain the layered master and upload a JPG, PNG or WebP export up to 10 MB. Generation starts at 0.5 credits per image, varying by model, quality and resolution; check the Generate button’s live cost.
Example cleanup instruction: Remove only the visible background clip; preserve the garment’s collar, label text, seams, print, silhouette, color and shadows.
Compare the result with the sources, including areas outside the requested change. Reject altered collar construction, label text, stitching, prints, silhouette or color. Reshoot any missing product detail.
For the full reconstruction workflow, see our Ghost Mannequin AI guide.
7. Check the catalogue set and export for its destination
Keep sources paired with names such as SKU_FRONT-HERO, SKU_BACK-LISTING, SKU_INNER-NECK and SKU_FRONT-FINAL. Match placement, margins and crop across comparable products without stretching garments to identical dimensions.
Save the layered master separately. Choose pixel dimensions, aspect ratio, background, format, color profile and compression for the destination’s current requirements. Web DPI metadata does not replace sufficient pixels.
- Correct SKU, color variant and view.
- Complete interiors and truthful silhouette.
- Clean edges with fibers and texture preserved.
- Accurate labels, stitching, prints and interior shadows.
- Color checked against the garment and neutral-reference capture.
- Consistent crop and destination-appropriate export.
Recap: approve the source set before undressing the mannequin
Style honestly, capture every required interior and keep sources compatible. Approve those photographs before removing the garment, then composite with masks and verify product details. After preserving an accurate master, use our Smart Edit photo editor for optional, narrowly scoped finishing.